Stitching Clam-Preparing for Leatherwork

Wooden Stitching Clam
When you purchase your first wooden stitching clam for holding your leatherwork while you work, there a few things you can do to make it worthy of holding your belts, bags and other projects.
Padding out the jaws: The first thing you’ll notice when you’ve unpacked it is that unlike the stitching clam you used while on a course, your new one won’t have any protection around the wooden jaws to prevent the leather from getting marked as the jaws grip your work, while you stitch…
The easiest way to go about this task is to separate the two main sections of the clam from each other by removing the two screws which hold the clamp pieces together. You may need either a spanner or an Allen key, depending on the type of fittings.
Now that you have the clam in two parts, you will need to secure some soft leather on the inside of the jaws at the top, using masking tape. It’s important to ensure that the ‘adhesive’ on the tape is positioned carefully so that it is holding the padding in place without allowing it’s adhesive to stick to any leather pieces that you’ll be working on.
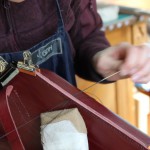
Stitching Clam holding a bag
Sanding: Before you reassemble the clam you might want to smooth any rough edges off with sandpaper, particularly if it’s going to be used for working on larger projects like handbags, as the leather will inevitably be resting against the edges of the clam as you stitch.
It’s advisable to wear a dust mask for sanding whether you’re working indoors, or out. A small sanding block wrapped in medium grade sandpaper does a great job of smoothing down any rough edges and if you repeat with a fine grade sandpaper, you’ll have a beautifully smooth stitching clam worthy of holding your work.
Reducing pressure: When you have reassembled the clam you may notice that it’s quite difficult to open and therefore equally difficult to get your project between it’s jaws. If fitted with a ‘butterfly’ nut you may simply need to loosen it off slightly to reduce the pressure. Occasionally though, this isn’t enough and if we find this is the case with one of our new clams in the workshop, then we lower the large screw which is normally positioned about half way up the clam. This is easily done if you’re handy with a drill and you can re set the screw very easily with the result being that you should have a stitching clam that’s easier to open.
Finally, dust down the clam with a damp cloth and you’re ready for stitching….
TIP: The stitching Clam is an essential part of a basic leatherwork kit