Butt and Box Stitch. Part 2 – Understanding Butt Stitch
 This is the second part of the short series ‘Butt and Box Stitch’. If you’ve got all the tools and materials listed in the first part of this series, you’re ready to practise Butt Stitch!
The term ‘Butt Stitch’ is really self explanatory; The first sketch shown here makes this a little easier to understand and shows the two edges of a single piece of leather being brought together before the stitching process begins. The edges are first ‘butted’ together, then stitched.
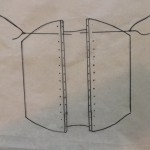
Sketch showing placement of harness needles for Butt Stitching leather
The second sketch shows the edges have been neatly ‘butted’ up against each other and you can see that the first few butt stitches have been done.
The stitching procedure itself is performed exactly the same way as it is with saddle stitch; it is the piercing that is different…
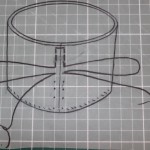
Sketch showing thread route for Butt Stitch
Whereas with saddle stitch the harness awl penetrates the leather from the grain side and exits the leather on the flesh side, with butt stitch the harness awl again penetrates the leather on the grain side, but exits the leather approximately half way down the thickness of the raw edge – look carefully at the third image and you will see that the awl exits along the narrow raw edges.
Practise Butt Stitch
- Cut a rectangular piece of 3mm leather approximately 10cm wide and as long as it needs to be to wrap neatly around any cylindrical object.
- Use the dividers to score a 4mm line along both short edges
- Mark the stitches with the Pricking Iron along both short edges ensuring that the partner stitches are precisely opposite each other, rather than slightly staggered.
- Lay one short edge of the leather along the top edge of your cork block.
- Starting in the first stitch mark and using a very sharp harness awl, push the tip of the awl half way down the thickness of the leather (1.5mm deep), then use your wrist to angle the tip of the awl approximately half w
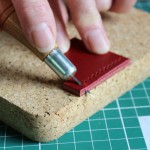
For Butt Stitch the Harness awl tip exits half way down the raw edge
ay through the 3mm raw edge. Once you have done this a few times, you will find it easier. Look again at the first sketch above for clarification.
- Work your way along both short edges, piercing one stitch at a time. As you’re just practising, don’t be too concerned if you tear through a stitch or two at this stage.
- When all the stitches have been pierced, look at the raw edges to see how successful you’ve been at exiting the awl tip at the half way point.
When you’re feeling confident with Butt Stitching, wrap the leather around the cylindrical object and secure with elastic bands before saddle stitching. Remember, as with Saddle Stitch, start in the second hole, work back to the first, then into the second again and on to the third, fourth etc. Work back a few stitches at the end.
The link to next part of this series is here: Butt and Box Stitch. Part 3 – Problems with Butt Stitch
PS: If you missed the first part of this series, the link to it is here: Butt and Box Stitch. Part 1 – Tool Up!