Butt and Box Stitch – Part 4. Preparing for Box Stitching
stitching right angles
On first sight Box Stitch can look a bit daunting, but it’s really not much different to Butt Stitch. If you’ve gained confidence in angling the harness awl to exit exactly where you want it for Butt Stitch, you’re just a small step away from mastering Box Stitch.
Make a small cylindrical pot or container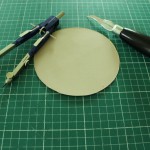
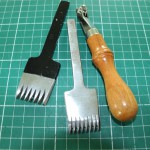
‘Preparing for Box Stitch’ is Part 4 of the ‘Butt and Box Stitch’ series, so to really benefit from this blog post you might want to read the three proceeding posts first – Part 4 assumes you have been following the series. You will need exactly the same tools and materials for this stitch as you did for Butt Stitch, plus a Pricking Wheel and a knife with a curved blade if you’d like to make the pot or container.
You should ideally also have a slightly smaller size stitch marker (Pricking Iron or Wheel) for the base of this project, than you have for the outer leather wrap.
Remember to sharpen your harness awl blade before you start!
- Cut a piece of leather long enough to wrap snugly around a cylindrical core or object ensuring that the two raw edges butt together neatly.
- Prepare the two short edges for Butt Stitching exactly as you did in Part 2 of this series, not forgetting to pierce the stitches at an angle.
- Along one long edge, score a divider line along the grain and flesh sides.
- Using the larger stitch marker/Pricking Iron, mark the stitches along this divider line.
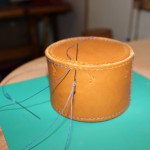
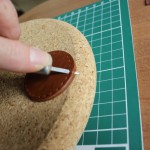
- Pierce the stitches straight through to the flesh side as you would for Saddle Stitch (see image), either in the stitching clam, or using a cork block of a suitable thickness.
- Edge dye and burnish this long edge. (edge shave/bevel, dye and burnish the top long edge and if you wish, you could add a row of decorative stitching).
- Wrap the leather around the cylindrical object and secure with elastic bands making sure that the two raw edges are again neatly butted together.
- Butt Stitch the two short edges together just as you practised previously in Part 2 of this series.
- Take a ruler and measure the inside diameter of the circle – Do not include the thickness of the leather in your measurement as you want the base to fit within the leather circle, rather than sit on top of it.
- Using a compass set to half the diameter of the base, draw a neat circle from card, cut it out, then check it fits snugly in the base.
- Using this card base as a pattern, position it on to the grain side of another piece of leather and carefully score around it with the scratch awl.
- Using a curved blade, cut out the leather base.
- Score a stitch line with the dividers around the perimeter of the base and using the smaller stitch marker/Pricking Wheel (a Pricking Iron can be used but is more difficult), mark the stitches.
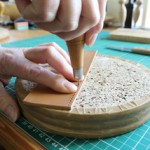
- Lay the leather base on the cork block and pierce the stitches with the harness awl using the same technique as you did for Butt Stitch in Part 2 of this series; but this time try and bring the awl out just below the half way point (see image), so slightly lower than for Butt Stitch.
In Part 5 of this series you’ll be practising Box Stitching! Start practising Box Stitch
PS: In case you missed it, Part 3 of this series can be found here: Butt and Box Stitch. Part 3 – Problems with Butt Stitch