Leather Card Slip-Part 2. Pattern Making
MAKING THE PATTERN
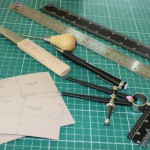
Leather Crd Slip – Pattern making Tools
Welcome to the second part of our series ‘How To Make a Leather Card Slip’. If you’ve gathered all of the tools, leather and thread that were listed in the previous post, Make a Leather Card Slip – Part 1. Tool Up! you’re ready to draw up the pattern for your card slip…
Take some pattern card, a fine pencil and a ruler, then carefully draw the two pattern pieces needed for this project. The measurements are:
- Pattern piece 1 – 10cm Width x 6cm Height
- Pattern piece 2 – 10cm Width x 10.5cm Height
Carefully cut out both pattern pieces using a ruler and a sharp knife, then double check the measurements of your pattern pieces.
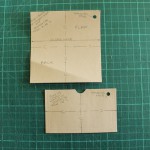 Mark the centre lines on both pattern pieces widthways and lengthways. Label each of these four lines with a large ‘C’.
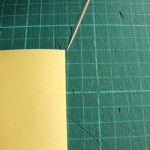
With the dividers set to 3mm, draw the stitch lines around one long edge and both short edges of pattern piece 1. Label these stitch lines ‘S.
With the dividers set to 6mm, now draw the glue lines around one long edge and both short edges of pattern piece 1. Label these glue lines ‘G’. (Note: these glue lines will not be transferred to the leather as they are only there as a reminder).
Accurately overlay pattern piece 1 onto pattern piece 2 using the centre lines as a guide, and with the scratch awl, gently score a soft line across the top long edge of pattern piece 2, running from left to right, at 6mm height – This is the fold line for your flap. Label this line ‘F’.
With the dividers set to 3mm, draw the stitch lines around the bottom long edge and both short edges of pattern piece 2, starting and finishing at the fold line. Label these stitch lines ‘S.
With the dividers set to 6mm, now draw the glue lines around the bottom long edge and both short edges of pattern piece 2, starting and finishing at the fold line. label these glue lines ‘G’. (Note: as before,these glue lines will not be transferred to the leather as they are only there as a reminder).
Pattern piece 2 should be labelled ‘Card Slip Back’ below the fold line and labelled ‘Flap’, above the fold line.
Pattern piece 1 should have ‘Pattern No 1 of 2’ written on it and pattern piece 2 should have ‘Pattern No 2 of 2’ written on it. Both pattern pieces should have the date written on them.
Double Check Your Measurements
Accuracy in pattern making is very important if you want your project to be successful and to look professional. Work through the steps above again, checking your measurements carefully. When you’re happy that your pattern pieces are accurately drawn and ready to use, go to the next blog post, How To Make a Leather Card Slip – Part 3.
Pattern card has not been squared off accurately
Tip: Check that all four edges/sides of your pattern card are square before using it to measure out your pattern.
TIP: Store your pattern pieces flat.
If you’d like to learn more about pattern making for leatherwork projects, why not purchase a copy of the new A4 print leatherwork magazine, ‘Waxing the Thread’?